Create the Hessian server implementation
Contents
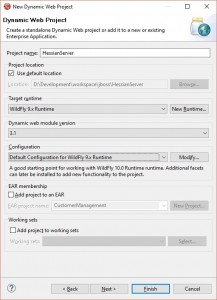
Let’s start with some server code. Create a new project by clicking into an empty area of the Project Explorer and select ‘New’ -> ‘Project’ -> ‘Web’ -> Dynamic Web Project’. In the next dialog, enter ‘HessianServer’ as the project’s name. Make sure your settings look like this:

Most importantly, you should have a ‘Target runtime’ defined. If not, click on the ‘New Runtime’ button and select the JBoss Community Wildfly 9.x runtime. When finished, you can create your first interface class. Interfaces are the backbone of Hessian. Objects which implement such an interface define the functionality which a client can get from a server.
We need the hessian-4.0.37.jar library included into our project. Open the project’s properties dialog and select ‘Java Build Path’. The ‘Libraries’ tab allows you to ‘Add External JARs…’. Select the previously downloaded hessian-4.0.37.jar file. In order to include it in the deployment assembly, select ‘Deployment Assembly’ in the project’s properties dialog and simply ‘Add’ it from the ‘Java Build Path Entries’.
Our goal is to serve a customer object to the client. Let’s create a simple customer class:
import java.io.Serializable;

public class Customer implements Serializable {
   int id;
   String firstname;
   String lastname;
   String email;
   String city;

   public Customer(int id, String firstname, String lastname, String email, String city) {
      super();
      this.id = id;
      this.firstname = firstname;
      this.lastname = lastname;
      this.email = email;
      this.city = city;
   }
   public int getId() {
      return id;
   }
   public void setId(int id) {
      this.id = id;
   }
   public String getFirstname() {
      return firstname;
   }
   public void setFirstname(String firstname) {
      this.firstname = firstname;
   }
   public String getLastname() {
      return lastname;
   }
   public void setLastname(String lastname) {
      this.lastname = lastname;
   }
   public String getEmail() {
      return email;
   }
   public void setEmail(String email) {
      this.email = email;
   }
   public String getCity() {
      return city;
   }
   public void setCity(String city) {
      this.city = city;
   }
}
Now we create the interface which defines the method to be used in order to get a customer object. Please note that the interface method getCustomer(int id) requires a parameter which will be provided by the client.
public interface CustomerAPI {
   Customer getCustomer(int id);
}
The following class which serves requests for the customer object extends the ‘HessianServlet’ Servlet class, which itself extends the ‘HttpServlet’ class, which means we don’t need to take care of the usual HttpServletRequest and HttpServletResponse objects and Http methods. Most importantly, though, is the interface it implements. Together with the project’s context root and URL mapping from web.xml this will be the link to our client later.
import com.caucho.hessian.server.HessianServlet;

public class CustomerServiceImpl extends HessianServlet implements CustomerAPI {

   @Override
   public Customer getCustomer(int id) {
      return new Customer(id, "Donald", "Duck", "donald@duckenterprise.com", "Entenhausen");
   }
}
Hessian only uses POST. This also means that Hessian is not for REST.
What’s left for our server implementation is the web.xml deployment descriptor. We only have one servlet class, so the deployment descriptor is really short:
<?xml version="1.0" encoding="UTF-8"?>
<web-app xmlns:xsi="http://www.w3.org/2001/XMLSchema-instance" xmlns="http://xmlns.jcp.org/xml/ns/javaee" xsi:schemaLocation="http://xmlns.jcp.org/xml/ns/javaee http://xmlns.jcp.org/xml/ns/javaee/web-app_3_1.xsd" version="3.1">
   <display-name>HessianServer</display-name>
   <servlet>
      <servlet-name>CustomerServiceImpl</servlet-name>
      <servlet-class>com.neuromechanics.CustomerServiceImpl</servlet-class>
   </servlet>
   <servlet-mapping>
      <servlet-name>CustomerServiceImpl</servlet-name>
      <url-pattern>/Hello</url-pattern>
   </servlet-mapping>
   <session-config>
      <session-timeout>
         30
      </session-timeout>
   </session-config>
</web-app>