Starting from scratch, using WiFi and the BME280 sensor
Contents
Starting from scratch, using WiFi and the BME280 sensor
To avoid confusion when adding the BME and WiFI functionality to our program, we’ll start from scratch and concentrate on WIFi and BME280. The wiring of both the display and the BM280 sensor looks like this:
The following code is ready to be uploaded on the NodeMCU module. This is what is does:
- Connect to the wireless network
- Requests an IP address from the router
- Creates a web server which sits there waiting for a client to issue a request
- The BME280 sensor module is initialized
- Weather data is read from the BME280 sensor as soon as a client request was received
As soon as a client connects to the NodeMCU’s IP address, a web page showing the sensor data is sent.

#include <Wire.h>
#include <ESP8266WiFi.h>
#include <Adafruit_Sensor.h>
#include <Adafruit_BME280.h>
Adafruit_BME280 bme; // I2C
const char* ssid = "YourWlanNetworkSSID";
const char* password = "YourWPA2Passphrase";
double h, t, p, dp;
char temperatureString[6];
char dpString[6];
char humidityString[6];
char pressureString[8];
WiFiServer server(80);
void setup() {
Serial.begin(115200);
delay(10);
Wire.begin(9 /* SDA */, 10 /* SCL */);
// Connecting to WiFi network
Serial.println();
Serial.print("Connecting to ");
Serial.println(ssid);
// Uncomment and adjust the following lines if you want to use a static IP address
// IPAddress ip(192, 168, 1, 106); // where xx is the desired IP Address
// IPAddress gateway(192, 168, 1, 1); // set gateway to match your network
// IPAddress subnet(255, 255, 255, 0); // set subnet mask to match your network
// WiFi.config(ip, gateway, subnet);
WiFi.setAutoReconnect(true);
WiFi.begin(ssid, password);
while (WiFi.status() != WL_CONNECTED) {
delay(500);
Serial.print(".");
}
Serial.println();
Serial.print("WiFi connected: ");
Serial.println(WiFi.localIP());
server.begin();
Serial.println("Web server running...");
delay(6000);
Serial.println(F("BME280 test"));
if (!bme.begin()) {
Serial.println("Could not find a BME280 sensor!");
}
}
double computeDewPoint2(double celsius, double humidity) {
double RATIO = 373.15 / (273.15 + celsius); // RATIO was originally named A0, possibly confusing in Arduino context
double SUM = -7.90298 * (RATIO - 1);
SUM += 5.02808 * log10(RATIO);
SUM += -1.3816e-7 * (pow(10, (11.344 * (1 - 1/RATIO ))) - 1) ;
SUM += 8.1328e-3 * (pow(10, (-3.49149 * (RATIO - 1))) - 1) ;
SUM += log10(1013.246);
double VP = pow(10, SUM - 3) * humidity;
double T = log(VP/0.61078); // temp var
return (241.88 * T) / (17.558 - T);
}
void getWeather() {
h = bme.readHumidity();
t = bme.readTemperature();
dp = computeDewPoint2(t, h);
p = bme.readPressure()/100.0F;
dtostrf(t, 5, 1, temperatureString);
dtostrf(h, 5, 1, humidityString);
dtostrf(p, 7, 1, pressureString);
dtostrf(dp, 5, 1, dpString);
delay(100);
}
void loop() {
// Listenning for new clients
WiFiClient client = server.available();
if (client) {
Serial.println("New client");
// boolean to detect end of http request
boolean blank_line = true;
while (client.connected()) {
if (client.available()) {
char c = client.read();
// If the client's http request was received completely, the device sends the
// http response which includes the web page in its body (payload)
if (c == '\n' && blank_line) {
getWeather();
client.println("HTTP/1.1 200 OK");
client.println("Content-Type: text/html");
client.println("Connection: close");
client.println();
// the actual web page that displays temperature, humudity and air pressure
client.println("<!DOCTYPE HTML>");
client.println("<html>");
client.println("<head><META HTTP-EQUIV=\"refresh\" CONTENT=\"15\"></head>");
client.println("<body><h1>ESP8266 Weather Web Server</h1>");
client.println("<table border=\"2\" width=\"456\" cellpadding=\"10\"><tbody><tr><td>");
client.println("<h3>Temperature = ");
client.println(temperatureString);
client.println("°F</h3><h3>Humidity = ");
client.println(humidityString);
client.println("%</h3><h3>Approx. Dew Point = ");
client.println(dpString);
client.println("°C</h3><h3>Pressure = ");
client.println(pressureString);
client.println(" hPa");
client.println("</h3></td></tr></tbody></table></body></html>");
break;
}
if (c == '\n') {
// when starts reading a new line
blank_line = true;
} else if (c != '\r') {
// there is still a character in the current line
blank_line = false;
}
}
}
// closing the client connection
client.stop();
Serial.println("Client disconnected...");
}
delay(100);
}
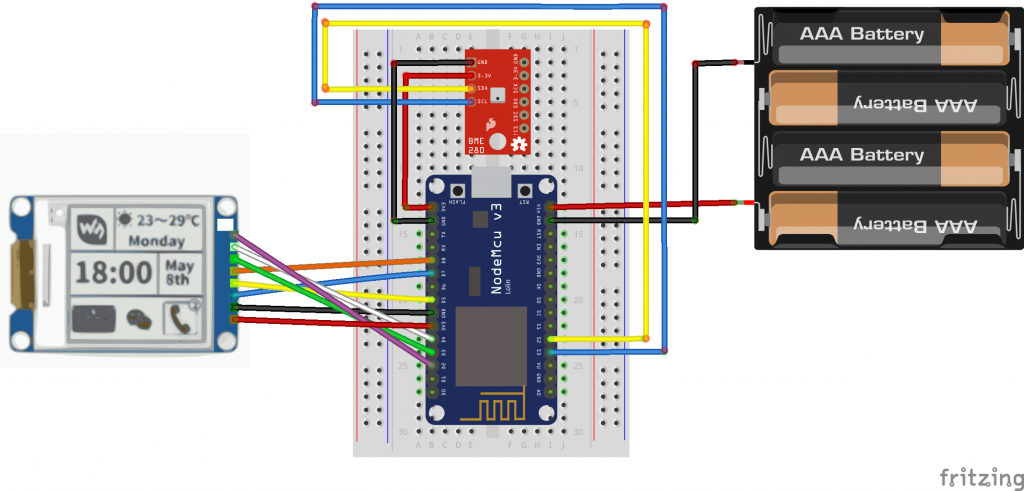
Wiring the BME280 sensor to the NodeMCU module can be tricky because we already use a bunch of pins, including one of the default I2C pins. The pins D1 and D2 correspond to the pin labels SDA and SCL or pin numbers 4 and 5 (take a look at the NodeMCU header file in your Arduino hardware directory. On my PC this is C:\Users\username\AppData\Local\Arduino15\packages\esp8266\hardware\esp8266\2.3.0\variants\nodemcu\pins_arduino.h). Fortunately pins are still available, but it is advisable not to use the D0 (GPIO16) pin. It seems to serve a special purpose which makes it unusable for our intentions. We will use pins SD2 and SD3 instead. Although the NodeMCU module pin labels often correspond to the #defines in the header file, this is not true for the SD pins (for whatever reason). On the pin layout diagram, these two pins correspond to the GPIO9 and GPIO10 pins of the ESP8266 chip. Because we don’t use the default I2C pins SDA (or D1 or 4) and SCL (or D2 or 5), we must provide the custom pin numbers to the wire constructur. See the corresponding line in above code:
Wire.begin(9, 10);
Your wiring ought to look like this:

If everything is wired correctly, the web page is online and displays BME280 sensor data. If the BME280 sensor is not found (see serial monitor), try swapping the cables at the SDA and SCL pins of the sensor.
What’s left to do is to integrate the Waveshare code into the Wifi / BME280 sketch. To make things easier (and this article much shorter), you can review / download the final code here at GitHub.
The code in the GitHub repository contains a few features which I didn’t cover in this article. Most noticably there is a I2C-Scanner function, which helps identifying problems with the BME280 sensor.

Computing the dew point but not using the result is stupid, but I consider it as a service to the readers who were looking for a professional dew point computation solution for degrees Celsius. Another issue I tried to circumvent is the slow display refresh rate and flickering when it is updated. As long as the temperature has not changed by at least 0.1 degrees or the humidity hasn’t changed by at least 1 percent, the display is not updated. The display module supports partial updates which eliminates this nuisance once and for all. So I changed the display update method to
display.updateWindow(0 /* x */, 0 /* y */, 200 /* w */, 200 /* h */, false);
But, after reading tons of forum posts it became apparent that this might not be the final solution. I will keep an eye on the screen’s contrast, because it might deteriorate after a prolonged time without performing full display.update(). Stay tuned.

I haven’t discussed the whole circuit’s power consumption. The Waveshare 1.54 inch display module provides power conservation features, but I don’t know yet how to make use of them (its not that there is much to be conserved, anyway. The display requires very little power). I’ve got the impression that they are automatically activated. If you want to run the whole setup on batteries, the ESP Deep Sleep mode comes in handy, too.
2 thoughts on - A simple NodeMCU / BME280 Weatherstation with WaveShare E-Paper 1.54 inch Display
..sehr informativ.. (bin über amazon link auf die Seite gekommen).. danke
First of all, thank you for all the information you have provided so far, I want to give you a quick update about connecting to NodeMCU, some new boards are coming with ESP8266EX which is much power friendly but for some reason a little bit more picky, Since I have both normal NodeMCU and that (Robodyn NodeM is a goos example) we must about using RESET on D4, instead I moved it DC BUSY and RST pins to D1, D2 and D3 respectively and it is working for both versions, I guess it would be good to have this reflected on your blog since It will discourage folks for using it. With this set I could, also, use originals WaveShare example successfully.
Here is the set of pins I am using, tested against GxEPD and EPDiF (WaveShare, smaller, less memory hanger and full featured)
// Pin definition
#define RST_PIN D0
#define DC_PIN D2
#define CS_PIN SS
#define BUSY_PIN D1