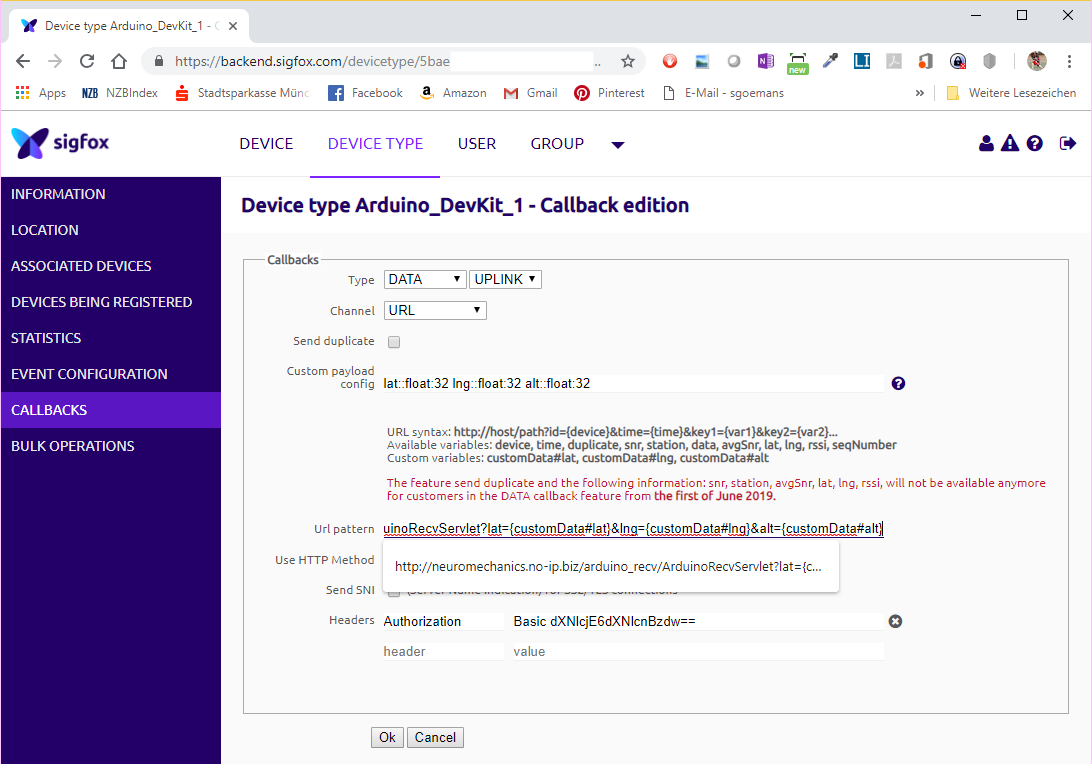
Sigfox Callback Edition
Contents
A picture can tell more than a thousend words:
 The ultimate goal is to store GPS data on our backend server. Using standard Java Servlet technology is a reasonable choice. I will present the servlet source code of the corresponding web application which runs in a Tomcat web container. This web application receives the GPS data from Sigfox network and stores it in a mySQL database.
Sigfox uses a Device Type Callback definition. It tells the network how to compose the URL’s query string and where to send the http request to. This requires a Sigfox network registration of your MKRFOX1200 device and a Sigfox user account. With this out of the way, we can setup the callback configuration for the registered device. To do that, you need to login on the Sigfox backend website: https://backend.sigfox.com/auth/login
Sigfox sends the GPS data it received from the MKRFOX1200 device through its gateway to the internet. Based on the above callback configuration, the gateway composes the query string and http header of the GET request. When this is done, the request is send to your backend web application.
Lets go through the most important settings on the Callback definition page:
Channel
Most callback examples use the email channel to send the data to the client/backend. A more professional approach would be to send the data using web technologies like servlet, REST, or SOAP WebService. Sigfox offers the URL channel to send data to the backend server in an http GET request. Because the data is transmitted in the URL’s query string, we can use servlets on the receiving backend. Don’t forget to select “URL” in the channel drop down list.
In there, the following data structure is used to prepare the data packet which is sent into Sigfox:
// GPS coordinate structure, 12 bytes size on 32 bits platforms
struct gpscoord {
float a_latitude; // 4 bytes
float a_longitude; // 4 bytes
float a_altitude; // 4 bytes
};
Custom payload config
This is the definition of the data variables/types that Sigfox expects from the IoT device. This configuration must match what the MKRFOX1200 module sends into the Sigfox network.
lat::float:32 lng::float:32 alt::float:32
Now is a good time to talk about the Arduino MKRFOX1200 sketch. For preparation, read this article: https://www.hackster.io/jgallar/gps-tracker-with-arduino-mkr-fox-1200-104012. The main difference between the Hackster article and this one is, that we don’t send the data via eMail, but via http query string. At the end of the Hackster article, the full MKRFOX1200 GPS Tracker source code is listed.
URL pattern
This field lets us define the URL and query string format that is sent to the backend server. For our server to be reachable through the internet, you typically enlists with a dynamic DNS service (DDNS) provider like DynDNS or no-ip. With the domain name you get from such a provider, you can configure a port forwarding entry in your internet router. It tells the router where to route the received request to in your home network. That’s of course the Tomcat server which by default listens to port 8080. If you want to learn about DDNS and Port Fowarding, see https://www.noip.com/support/knowledgebase/general-port-forwarding-guide/.
Let’s get back to the URL pattern. Take a look at the following URL:
http://neuromechanics.no-ip.biz/arduino_recv/ArduinoRecvServlet?lat={customData#lat}&lng={customData#lng}&alt={customData#alt}
If we disassemble the above URL, the different parts of it become more obvious:
Protocol: http
Target server address: neuromechanics.no-ip.biz
Web context path: arduino_recv
Servlet name: ArduinoRecvServlet
Query string: lat={customData#lat}&lng={customData#lng}&alt={customData#alt}
The Sigfox callback configuration allows us to define placeholders (customData) that will be filled with the corresponding data from the payload of the message that the MKRFOX1200 module transmitted into the Sigfox network. The above query string contains three attributes. The receiving servlet can retrieve these values by the following code snippet (see line 32 – 34 in the code listing of section Channel).
String lat = request.getParameter("lat");
String lng = request.getParameter("lng");
String alt = request.getParameter("alt");
Headers
We want to add an Authorization header to the http request that Sigfox sends to our server. If you don’t want to use Basic Authentication, just skip this step.
To make things easier, you can compile an authorization header on this website: https://www.blitter.se/utils/basic-authentication-header-generator/ . Copy & paste the result to a newly created authorization header on the Sigfox callback definition page.