Intermediate step: GPS & WiFi
Contents
As an intermediat step, I suggest to test the servlet with real GPS data. This step is just for making sure that the Tomcat setup and servlet deployment is working, If that is not of any concern for you, you can as well drop this step.
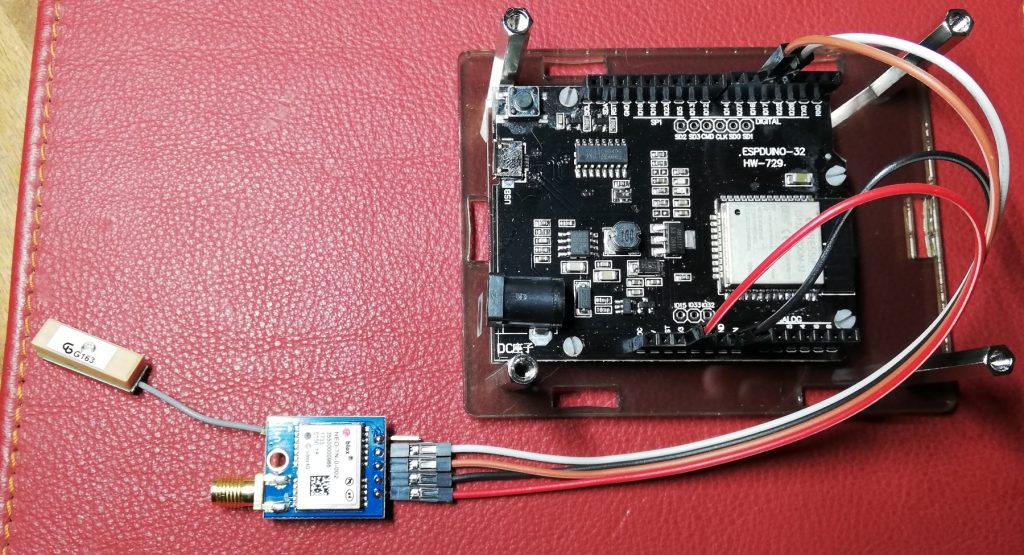
The connection of a NEO-6M GPS module to an ESP8266-based WiFi module is simple. You can use any kind of ESP8266 based module like Wemos D1 or Adafruit Huzzah. Even an Arduino UNO with a Wifi Shield would do as long it is based on the ESP8266 family of products. See my setup using an ESPDuino-32 and a NEO-7M module.
dav
In the code below, pay special attention to the HardwareSerial in line 10. In my ESP-32 based setup, the trick is to use HardwareSerial library to access UART 1 and 2 instead of Serial1 and Serial2. The class HardwareSerial accepts one parameter in its constructor, which is a number of UART. Values can be 0 for UART 1 and 2 for UART 3. HardwareSerial(0) is the same as Serial so be aware. Info about the hardware serial ports of ab ESP-12 module can be found here: http://esp8266.github.io/Arduino/versions/2.0.0/doc/reference.html
#include <WiFi.h>
#include <HTTPClient.h>
#include <TinyGPS.h>

#define NUMCHARS 82          // Reserve 82 bytes for longest NMEA sentence

const char* ssid = "<Your_SSID_goes_here>";
const char* password = "<Your_network_password_goes_here>";

HardwareSerial S2(2);

TinyGPS gps;

String sendBuffer = "";   // an array to store the transmission data
boolean newData = false;
float latitude  = 0.0f;
float longitude = 0.0f;
float altitude = 0.0f;

void setup () {
  Serial.begin(9600);
  S2.begin(9600, SERIAL_8N1, 16, 17);
  sendBuffer.reserve(NUMCHARS);                    // Reserve 82 bytes for longest NMEA sentence
  WiFi.mode(WIFI_STA);
  WiFi.begin(ssid, password);
  connect();
}

void sendData(String s) {
  if (WiFi.status() == WL_CONNECTED) {    //Check WiFi connection status
    HTTPClient http;                      //Declare an object of class HTTPClient

    String url = "http://192.168.1.105:8080/arduino_recv/ArduinoRecvServlet?";
    url+=s;
    Serial.println(url);
    http.begin(url);                       //Specify request destination
    http.addHeader("authorization", "Basic dXNlcjE6dXNlcnBzdzE="); // (user:passwd -> user1:userpsw1)
    int httpCode = http.GET();             //Send the request
    if (httpCode > 0) {                    //Check the returning code
      Serial.println(http.getString());             //Print the response payload
    }
    http.end();   //Close connection
  }
}

void connect() {
  int i;
  Serial.print("Connecting ...");
  for (i = 0; i < 8; i++) {
    if (WiFi.status() != WL_CONNECTED) {
      delay(1000);
      Serial.print(".");
    } else {
      Serial.println("");
      Serial.println("Connected !");
      break;
    }
  }
}

void loop() {

  while (S2.available()) {

    char GPS_info_char = S2.read();
    if (gps.encode(GPS_info_char)) {
      gps.f_get_position(&latitude, &longitude);
      altitude = gps.altitude() / 100;
      String s = "";
      s+="lat="; s+=String(latitude,6);
      s+="&lng="; s+=String(longitude,6);
      s+="&alt="; s+=String(altitude,2);
      s+='\n';
      sendData(String(s));
    }
  }
  delay(50);
}
Nevertheless, it is important that the servlet (see previous chapter) is successfully deployed to Tomcat and responds to http GET requests before we start testing with real GPS tracker data. To make sure it does, there are plenty of tools that allow you to define requests and send them to the server on which the servlet has been deployed. The Chrome web apps Postman and ARC are such tools. See an example using the Advanced REST Client (ARC):
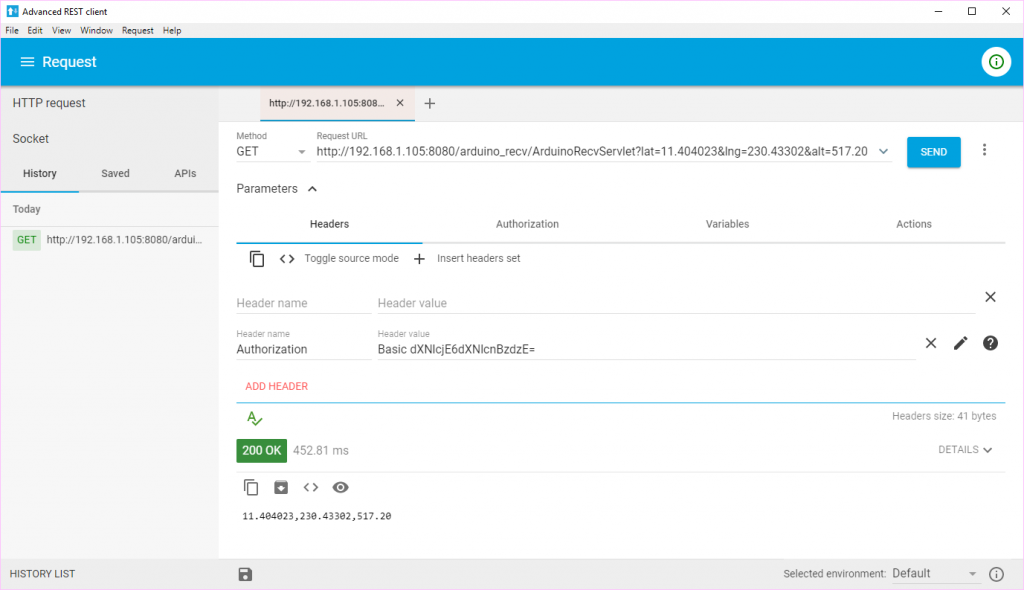
As you can see, the specified query string has the same format as the query string which we configured on the Sigfox callback configuration page.