Introduction
A fluid workflow is essential for effective and fast web client development. You want to immediately see the result fo any code change without having to monoteonously refresh the page in your browser or running required build commands each time. A good workflow is established when your browser window automatically refreshes the page as soon as you save a code change in your IDE.
Prerequisite
Install Node.js on your development machine if you haven’t done so in the past: https://nodejs.org/en/download/
You should have a basic understanding of what Node.js/npm is.
Setup
Create a project directory in your workspace folder, e.g. .\SPAforDummies.
Open a command line window and change into that directory. To initialize the project, enter the following command:
npm init
This command will ask you some questions to generate a package.json file in your current folder (which ought to be your targeted project folder).
For this article, we also need jQuery and a few webpack modules, so proceed as follows:
npm install jQuery --save

npm install webpack --save-dev

npm install webpack-cli --save-dev

npm install webpack-dev-server --save-dev

npm install html-webpack-plugin --save-dev
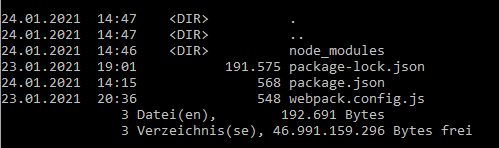
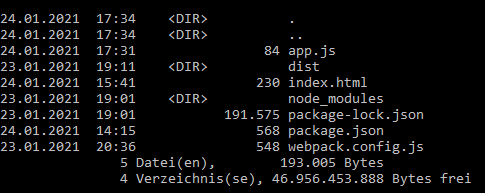
After running the above commands, your project folder contains the following files:
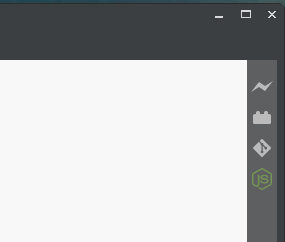
In this article I use Brackets as my IDE, but there are alternative IDEs which also provide the necessary Node.js integration (e.g. WebStorm). I use Brackets because its free and can be customized with tons of plugins, of which you will need NodeJSintegration. Make sure you have this plugin installed in your Brackets installation. Its installed if you see the green Node.js icon in the upper right corner of the Brackets window:
When you click on this icon, a Node.js tool window is opened or closed in the lower half of the Brackets window. There you can select default or self-defined jobs and run them. The running jobs produce log messages which scroll through the text area of the tool window. Currently, we don’t have any customized jobs.
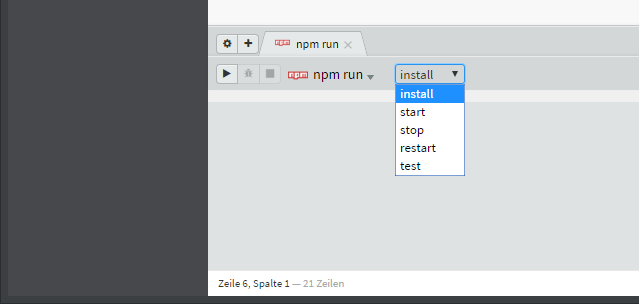
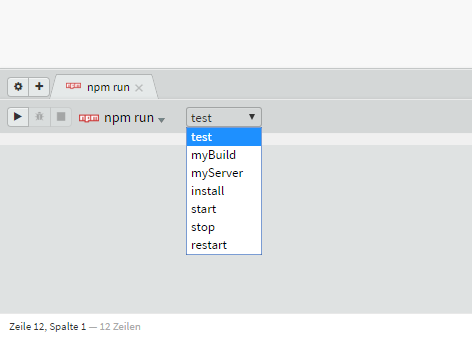
Brackets needs to be told which project directory it has to work with, not only because we want to work with our files , but also because the Brackets Node.js integration plugin needs to read the package.json file. This file contains a “scripts” section which is used to define default and custom jobs/scripts. These jobs are shown in the Node.js tool window drop down list. This list already contains default items like “start”, “stop”, “install”, “restart”, and “test”, even without a corresponding entry in the “scripts”-section. See picture above.
In order to get our workflow up and running, we need to add at least two entries. The name of the jobs can be chosen freely, but the aforementioned default entries serve special purposes and should not be used without intention. Let’s start with a “myBuild” job:
"myBuild": "webpack --progress --mode=development"
This tells the webpack node module to run in “development” mode and to display a progress indicator during build. What exactly webpack is configured to do is defined in a special webpack configuration file called webpack.config.js. This was auto-created during installation of the webpack module. We’ll take a look at it later.
Webpack is a packaging tool which collects all files that your SPA webpage is comprised of and places it in a distribution folder. The content of this distribution folder is then ready to be deployed on a webserver for public access. We can open the index.html file in this folder with a browser to check our work, but this would require to at least refresh the browser window after each code change to see its effect. Webpack can make it even easier for you by automatically deploying your webpage into its own web server and auto-refresh it. Remember that we installed several webpack modules back then? webpack-dev-server is the one which provides the webserver to which the webpage is deployed. It will automatically open a browser window with your webpage being auto-loaded. Subsequent changes to your webpage code will automatically be synchronized with this browser window. You don’t even need to run the build script because everything is done in memory by the webpack-dev-server. This is also the reason why you can’t see any files being created during deployment. Its all im RAM. As a result, the build job just need to be run once when you are ready to do some final integration tests.
The second job you need to add to the “script”-section is the one which provides the workflow that we wanted:
"myServer": "webpack serve --open"
This job runs indefinitely and can only be stopped by interrupting its process. In a command line tool this would be CRTL + C. The Node.js tool window contains a Stop-button which does the same. Please note that you can’t run any other job while the dev-server is running in the tools window. To avoid that, you can alternatively run the server job in a command line window. This is effectively the same as running it from the Node.js tools window, but it leaves the tool window operable.
Take a look what the package.json file now might look like:
{
"name": "myProject",
"version": "1.0.0",
"description": "My SPA project",
"main": "index.html",
"scripts": {
"test": "No test framework in use yet",
"myBuild": "webpack --progress --mode=development",
"myServer": "webpack serve --open"
},
"author": "Stephan Goemans",
"license": "MIT",
"devDependencies": {
"html-webpack-plugin": "^4.5.1",
"webpack": "^5.17.0",
"webpack-cli": "^4.4.0",
"webpack-dev-server": "^3.11.2"
},
"dependencies": {
"jquery": "^3.5.1"
}
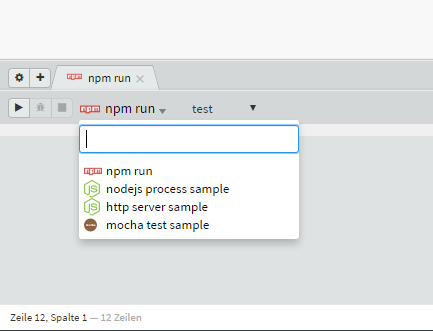
}With the above package.json file, the Brackets Node.js plugin will offer the new “script”-entries to choose from. But not until the Node.js tool has been instructed to reload the package.json file. You do this by just selecting the npm-run command:
After that, the job list should contain the new “myBuild” and “myServer” entries:
What’s still missing is the webbpack.config.js file. This file contains configuration parameters which tell webpack where to look for source files, where to put the processed distribution files, and how to configure the webserver that will provide live-preview of your webpage. Well, not only a “preview”, but almost the fiinal version of it.
// webpack.config.js

const HtmlWebpackPlugin = require('html-webpack-plugin');
const path = require('path')
module.exports = {
  mode: 'development',
  entry: './app.js',
  output: {
    filename: 'main.js',
    path: path.join(__dirname, './dist')
  },
  plugins: [
    new HtmlWebpackPlugin({
      template: './index.html'
    })
  ],
  devServer: {
        contentBase: 'dist',
        inline: true,
        host: "localhost",
        watchContentBase: true,
        port: 8080
  }
};
An SPA webpage usually consists of an index.html file, some CSS and Javascript. To demonstrate the workflow, the index.html and a javascript file is enough. The starting point of many SPA webpages is index.html. Add such a file to the project’s root directory:
<!DOCTYPE html>
<html>
<head>
 <meta charset="UTF-8">
 <meta name="viewport" content="width=device-width, initial-scale=1">
 <title>myProject</title>
</head>
<body>
 <div id="findMe"></div>
</body>
</html>
We need a javascript file which does something and which we will edit/save later in order to see the effect:
// app.js
import $ from 'jquery'
 $("#findMe").html("<p>Hello, myWorld!</p>")
Your project directory now looks like this:
You might wonder why there is no script tag for app.js script in the index.html file. That’s because webpack-dev-server automatically loads the file into memory (as well as all other “import”ed files) if you included the HtmlWebpackPlugin in webpack.config.js and point it to the index.html template. When finally building the project using the “myBuild” script, the HtmlWebpackPlugin copies index.html to the distribution folder, and also adds the javascript entry point in a script tag to it.
Final Workflow
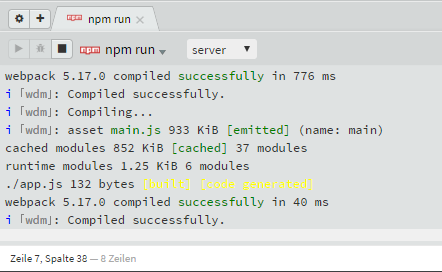
In this section of the article we want to try the workflow described above. If everything was set up correctly, the “myServer” script should be available in Brackets Node.js tool window. Select it and click on the “Start”-button. You will notice that the log output scrolls through the text pane of the tool.
If everything works as expected, the index.html file will be opened by your default browser. Pressing F12 launches the browser’s development tool (devTools). Switch to the devTools console to see the logging output (e.g. from console.log() statements in your app):
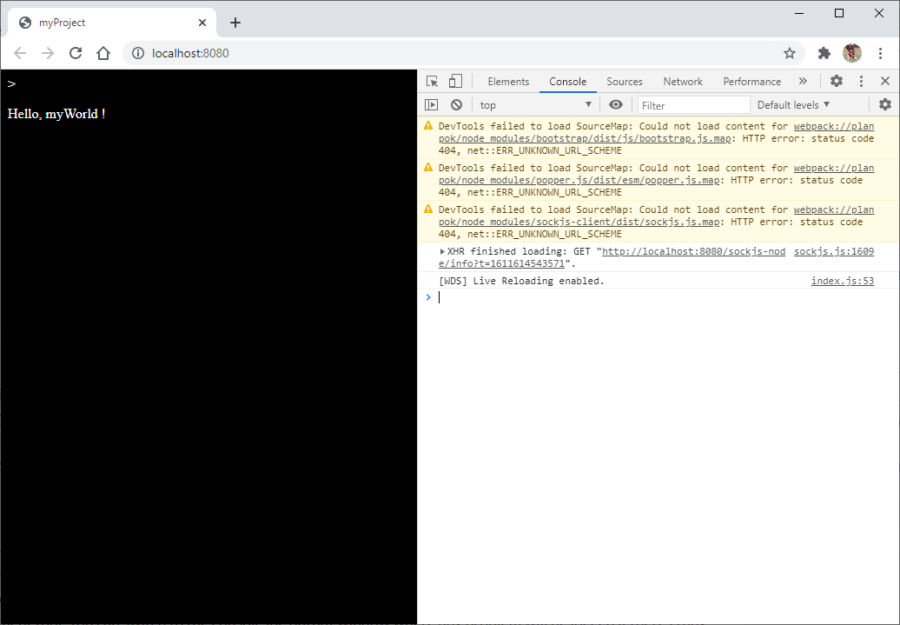
Don’t mind those warnings about SourceMaps. If there isn’t any red colored text, you are fine. If there is, good luck.
Well, finally you can try the workflow by editing the javascript file app.js. Just change the text in the line
$("#findMe").html("<p>Hello, Welcome to my World!</p>")
Save the file and watch how the browser synchronizes with your change.
We haven’t used the “myBuild”job yet, so what’s with it? The “myBuild” job creates a distributable version of your web app in the ./dist folder. As long as you are happy with your local webpack-dev-server, you don’t need it, but at some time in the future you’ll want to take your webapp to a webhosting companies internet server. If everything works perfectly fine, you need to run the myBuild job only once in order to create a distributable version of your web app.
Handling of CSS files
What I haven’t covered so far is the handling of CSS files. Although we already have the index.html and one or more javascript files, it very likely that your web app needs a style sheet. Of coures you want to include CSS files to your live-preview workflow. In order to handle CSS files, webpack makes use of so called “loaders”. You can find a very good article about “loaders” in webpack here: https://blog.jakoblind.no/css-modules-webpack/
Let’s quickly cover the steps to also handle CSS files in our workflow.
First download the required Node.js module style-loader by entering the followinf command:
node install style-loader --save-dev
After this your package.json file should look like this:
{
"name": "myProject",
"version": "1.0.0",
"description": "My SPA project",
"main": "index.html",
"scripts": {
  "test": "No test framework in use yet",
  "myBuild": "webpack --progress --mode=development",
  "myServer": "webpack serve --open"
},
"author": "Stephan Goemans",
"license": "MIT",
"devDependencies": {
  "html-webpack-plugin": "^4.5.1",
  "style-loader": "^2.0.0",
  "webpack": "^5.17.0",
  "webpack-cli": "^4.4.0",
  "webpack-dev-server": "^3.11.2"
},
"dependencies": {
  "jquery": "^3.5.1"
}
}
The extended version of thewebpack.config.js file looks as follows:
// webpack.config.js

const HtmlWebpackPlugin = require('html-webpack-plugin')
const path = require('path')

module.exports = {
  target: "web",
  mode: 'development',
  entry: './app.js',
  output: {
    filename: 'main.js',
    path: path.join(__dirname, './dist')
  },
  module: {
    rules: [
      {
        test: /\.css$/,
        use: [
          'style-loader',
          'css-loader'
        ]
      },
      {
       test: /\.svg$/,
       use: 'file-loader'
     }
    ]
  },
  plugins: [
    new HtmlWebpackPlugin({
      template: './index.html'
    })
  ],
  devServer: {
      contentBase: 'dist',
      inline: true,
      host: "localhost",
      watchContentBase: true,
      port: 8080
  }
};
Don’t forget to let the Brackets node plugin reload the package.json. As already mentioned earlier you just need to select the npm run runner again for the script drop down list to refresh.
That’s the end of this article.