Table of Contents
Introduction
This article covers more advanced topics like routing and deployment to professional web servers like tomcat. For newbies I recommend reading my previous article about a simple workflow for developing SPA web applications.
We will continue to use live-preview as the backbone of our workflow, but now and then you’ll want to check your app on how it is behaving on an industrial strength webserver. Read here what Apache says about its Tomcat webserver: “Apache Tomcat software powers numerous large-scale, mission-critical web applications across a diverse range of industries and organizations.”
What I’m demonstrating in this article is the typical SPA/javscript live-preview development workflow with intermediate deployments to tomcat webserver.
SPA and routing
Routing reduces subsequent page load times. Plenty of modern frameworks (Angular, React, Vue, …) encourage Single Page Applications (SPA) with routing because of the faster response time and therefor better user experience. Simply put does a router catch all clicks on weblinks from within your app and, instead of requesting a new page from a server, deals with it internally by pure javascript. Therefore SPA development requires heavy Javascript coding.
When you, for example, enter http://YourWebServer:8080/SPA/ in your browser, it will send a http request to the server, and then the server will probably respond by sending you an initial /test/index.html file, plus included javascript files, css, images. From then on, an SPA will internally handle all subsequent clicks on links on that initial webpage.
Let’s assume the app has a to-do list feature. The link to display the To-Do view might look like this: /SPA/todos/. You don’t want your app to send a http request with this URL to the webserver, most notably because there is no webpage with that address in the first place. The link must be routed to an interal javascript logic that is responsible for handling the To-Do list.
A simple organizer web app
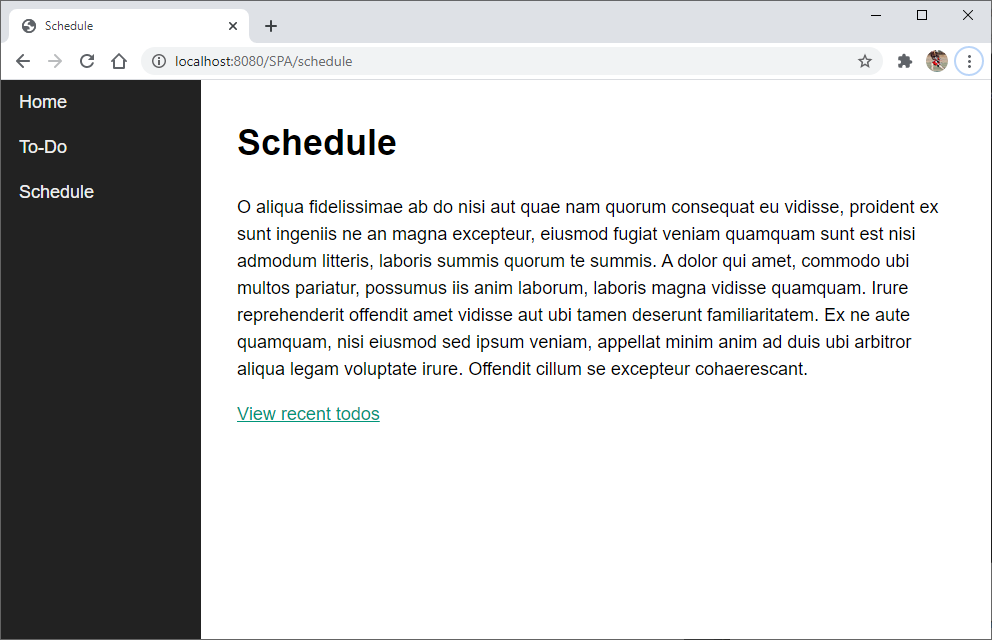
This example has three different screens (views). A home view, a to-do view, and a schedule view. I will limit the views to just display some latin text. Putting more functionality into this demo app would exceed the scope of this tutorials.
We want the home, todos and schedule views to be displayed by just re-rendering portions of the page, and updating the browser’s address bar for a consistent page history (using HTML5 history API and pushstate()). All without ever asking the webserver for assistence. That’s the whole idea behind single page applications. See an example of the final page:
Let’s make some preparations. Create the project’s root folder with the name “SPA” in your workspace. Start Brackets and open the root folder for this project. You’ll need the “NodeJS integration” Brackets plugins. Feel free to also load the “Lorem Ipsum” Brackets plugin because its convenient if you need big text chunks for dummy pages.
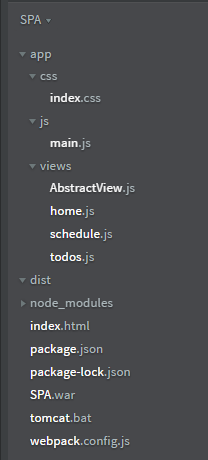
Before we begin creating files and folders, take a look at the final directory tree:
Usually the first file to start a new NodeJs-based project ispackage.json:
{
    "name": "SPA",
    "version": "1.0.0",
    "description": "",
    "main": "index.html",
    "scripts": {
    "test": "No test framework in use yet",
    "myBuild": "webpack --progress --mode=development",
    "warDeploy": "tomcat.bat",
    "myServer": "webpack serve --open"
    },
    "author": "YourNameGoesHere",
    "license": "ISC",
    "devDependencies": {
        "html-webpack-plugin": "^4.5.1",
        "webpack": "^5.18.0",
        "webpack-cli": "^4.4.0",
        "webpack-dev-server": "^3.11.2"
    }
}
Create the package.json file in your project’S root folder “SPA” and fill it with the above content. Open a command line tool and change your current directory to “SPA”. Enter npm init in order to download all required plugins and to define out workflow scripts “myBuild”, “warDeploy”, and “myServer”.
Our workflow requires webpack for packaging our webapp into a distribution bundle, and webpack-dev-server for live-preview.
// webpack.config.js

const HtmlWebpackPlugin = require('html-webpack-plugin');
const path = require('path')
module.exports = {
  mode: 'development',
  entry: [ './app/js/main.js' ],
  output: {
    filename: 'main.js',
    path: path.resolve(__dirname, 'dist'),
    publicPath: "/",
  },
  plugins: [
    new HtmlWebpackPlugin({
      template: './index.html'
    })
  ],
  devServer: {
      historyApiFallback: true,
      publicPath: "/",
      contentBase: '.',
      host: "localhost",
      watchContentBase: true,
      port: 8080,
      watchOptions:{
            ignored: "/node_modules/"
    }
  }
};
Pay particular attention to the following attributes in webpack.config.js:
historyApiFallback: true,
publicPath: "/",
Of course we need an index.html file as the initial trigger of the app:
<!DOCTYPE html>
<html lang="">
<head>
  <meta charset="utf-8">
  <title>Single Page App</title>
  <meta name="author" content="Your Name">
  <meta name="viewport" content="width=device-width, initial-scale=1.0">
  <link rel="stylesheet" href="/app/css/index.css">
</head>
<body>
  <nav class="nav">
  <a href="/SPA" class="nav__link" data-link>Home</a>
  <a href="/SPA/todos" class="nav__link" data-link>To-Do</a>
  <a href="/SPA/schedule" class="nav__link" data-link>Schedule</a>
  </nav>
  <div id="app"></div>
</body>
</html>
Now let’s take a look at the actual router logic:
// main.js

import home from "../views/home.js"
import todos from "../views/todos.js"
import schedule from "../views/schedule.js"

const navigateTo = url => {
    history.pushState(null, null, url);
    router();
};

const router = async () => {
    const routes = [
        { path: "/SPA", view: home   },
        { path: "/SPA/todos", view: todos   },
        { path: "/SPA/schedule", view: schedule}
    ];
    const routesMatches = routes.map(route => {
        return {
            route: route,
            isMatch: location.pathname === route.path
        };
    });
    let match = routesMatches.find(rMatch => rMatch.isMatch);
    if(!match) {
        match = {
            route: routes[0],
            isMatch: true
        };
    };

    const view = new match.route.view();
    document.querySelector("#app").innerHTML = await view.getHtml();
    console.log(match.route.path);
};

document.addEventListener("DOMContentLoaded", () => {
     document.body.addEventListener("click", e => {
         if(e.target.hasAttribute("data-link")) {
             e.preventDefault();
             navigateTo(e.target.href);
         }
     });
    router();
});
For the above code to work properly we need three views, “home”, “todos” and “schedule”. These views will individually be filled into the div tag with the id of “app”. Because all three views have identical behaviour, its best practice to create an abstract class first and let it inherit by the three classes. So create the abstract class AbstractView.js first:
// AbstractView.js

export default class {
  constructor() {
  }
  setTitle(title) {
    document.title = title;
  }
  async getHtml() {
    return "";
  }
}
Here is the “home”-view. Create the home.js file and put the following code into it:
import AbstractView from "./AbstractView.js";

export default class extends AbstractView {
    constructor() {
        super();
        this.setTitle("Home");
    }
    async getHtml() {
/*
Template literals are enclosed by the backtick (` `) (grave accent) character instead of double or single quotes.
emplate literals can contain placeholders. These are indicated by the dollar sign and curly braces (${expression}).
The expressions in the placeholders and the text between the backticks (` `) get passed to a function.
Any newline characters inserted in the source are part of the template literal.
*/
        return `
<h1>Welcome back</h1>
<p>Ipsum offendit sed fugiat lorem. E legam duis lorem occaecat eu appellat in
varias. O aliqua fidelissimae ab do nisi aut quae nam quorum consequat eu
vidisse, proident ex sunt ingeniis ne an magna excepteur, eiusmod fugiat veniam
quamquam sunt est nisi admodum litteris, laboris summis quorum te summis.
A dolor qui amet, commodo ubi multos pariatur, possumus iis anim laborum, laboris
magna vidisse quamquam. Irure reprehenderit offendit amet vidisse aut ubi tamen
 deserunt familiaritatem. Ex ne aute quamquam, nisi eiusmod sed ipsum veniam,
appellat minim anim ad duis ubi arbitror aliqua legam voluptate irure. Offendit
cillum se excepteur cohaerescant.
</p>
<p>
<a href="/SPA/todos" data-link>View recent todos</a></p>`;}
}
This is the template for the remaining two views. Just copy it to “todos.js” and “schedule.js” and change a few things. Now is a good time to try out the app by using the workflow as described in my previous article SPA Development Workflow with Brackets, Node.js/npm and WebPack.
Using Tomcat
If you want to use Tomcat instead of webpack-dev-server, we can implement a similar fluid workflow with Tomcat. Unfortunately, I could not figure out a way to auto-refresh the page on code changes. As a result, you need to refresh the page in the browser each time you want to see a live preview.
There are multiple ways to deploy a webpage to Tomcat. For our purpose, we just need to copy the web archive (.war) file to the deployment folder of Tomcat. Before we can do that, we need to create the .war file with the web app in it. The structure of a .war file is basically a ZIP file with additional web server control files in it. The Java SE Development Kit (JDK) contains a command line tool which can create a war file. For the next step you ultimatly need a properly installed JDK on your development PC.
First create a DOS/Windows command batch file called tomcat.bat. Put the following lines in it:
del .\SPA.war
jar -cvf .\SPA.war .\dist\*
copy SPA.war C:\PathToYourTomcatWebAppsFolder\SPA.war
In order to fill our project’s .\dist\ folder with the deployable web app, the npm script “myBuild” must be run. This script will collect all javascript and css files and put them into .\dis\main.js. Together with index.html, our web app is ready for deployment. The deployment artifact (SPA.war) is created by the warDeploy npm script in package.json.
Add the following two configuration files to your war file (if you are using tomcat from within Eclipse, look here:
...\workspace\.metadata\.plugins\org.eclipse.wst.server.core\tmp0\wtpwebapps\SPA\WEB-INF\rewrite.config. WEB-INF\rewrite.config:
RewriteRule ^/dashboard(.*)$    /index.html [L]
RewriteRule ^/posts(.*)$    /index.html [L]
RewriteRule ^/settings(.*)$ /index.html [L]
(if you are using tomcat from within Eclipse, look here: …\workspace\.metadata\.plugins\org.eclipse.wst.server.core\tmp0\wtpwebapps\SPA\META-INF\context.xml)
META-INF\context.xml:
<?xml version="1.0" encoding="UTF-8"?>
<Context>
  <Valve className="org.apache.catalina.valves.rewrite.RewriteValve" />
</Context>